minicom

Linux底下的Hyperterminal,安裝方式如下:

sudo apt-get install minicom

登入至minicom主畫面後按下Ctrl+A,再按下Z鍵就會看到如上的設定選單了。

Boot USB Drive in VirtualBox

VirtualBox官方認為Boot from USB Drive的使用需求不高,所以截至至今(VirtualBox 4.x)這個功能仍然沒有加上去,但是我們可以透過以下的方式,使用Rawdisk的原理來達成使用USB Drive開機的功能。

取得磁碟標籤:
sudo fdisk -l
透過上面的指令來取得你的USB Drive的位置,已我的為例:/dev/sdb

建立虛擬硬碟vmdk:
sudo VBoxManage internalcommands createrawvmdk -filename ~/USB.vdi -rawdisk /dev/sdb
輸入完上面的指令後在~/底下就可以找到USB.vdi這個檔案,檔案很小應該不超過1MB。

啟動VirtualBox:
sudo VirtualBox
因為接下來的步驟需要直接存取/dev/sdb的權限,所以必須以root的身份來啟動VirtualBox


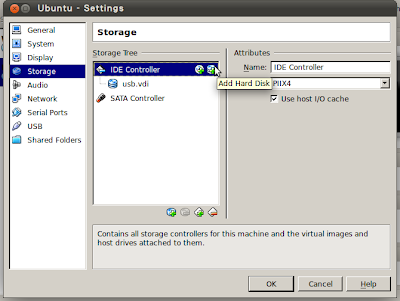
在IDE Controller裡新增Disk,將USB.vdi加進去,設定完畢之後你就可以以USB來開機了。

透過以上的方式,就可以將系統安裝至USB裡面,然後透過VirtualBox去直接啟動USB內的系統,這樣子就可以達成Portable USB OS的功能,讓資料永遠都是存在USB裡面,但是同時又兼具Host/Guest啟動的用途。

Qt SDK Linux Online + PyQt

Official Website: http://qt.nokia.com/

絕大部分的人裝Qt都不用像我的手續那麼多,透過apt-get幾分鐘後就可以完成。只是因為有時候我需要一些實驗性的新功能,所以必須手動更新至最新版的Qt開發環境,安裝過程就顯得稍微多一點,以下是我在Ubuntu 11.04底下安裝Qt和PyQt的過程

Step 1. 準備套件
由於Python的部份我是之前沿用系統預設的2.7版本,所以直接安裝python2.7-dev即可,而libxext-dev是之後編譯PyQt時會需要用到。
sudo apt-get install python2.7-dev libxext-dev
Step 2. 安裝Qt
下載Qt SDK 網路安裝版安裝,由於是線上安裝程式,整個安裝過程可能會要幾十分鐘到幾小時(視網路速度而定)

Step 3. 設定Qt
安裝完後QtSDK會在你的/home目錄底下,我們要將QtSDK/Desktop/Qt/473/gcc/bin設定在PATH路徑裡(修改~/.profile裡最後一行PATH的值),並且要將Libraries給link起來,透過以下指令完成(請把路徑換成你的QtSDK安裝的位置)
sudo ldconfig /home/xinyu/QtSDK/Desktop/Qt/473/gcc/lib
Step 4. 安裝SIP
Download: http://www.riverbankcomputing.co.uk/software/sip/download
透過以下指令即可安裝完成
python confgiure.py
make
sudo make install

Step 5. 安裝PyQt
Download : http://www.riverbankcomputing.co.uk/software/pyqt/download

由於QtSDK是以static libraries的方式安裝,所以在執行configure.py時要帶上-g參數,完整安裝指令如下:
python confgiure.py -g
make
sudo make install

沒意外的話這樣子你安裝完成了。

Flac/APE Spliter

要將一個單一的flac/ape檔依照cue的內容來分割可以安裝以下套件來完成:
sudo apt-get install cuetools shntool
當然你可能還需要一些編碼套件:
sudo apt-get install flac wavpack
最後在terminal底下切換到你要轉換的目錄底下輸入以下指令即可分割flac檔
cuebreakpoints *.cue | shnsplit -o flac *.flac
如果是要分割ape檔指令替換如下即可:
cuebreakpoints *.cue | shnsplit -o flac *.ape

IOMeter

Official Website: IOMeter

IOMeter是一個專業的I/O效能量測工作,是由Intel開發團隊設計出來的,並於1998年發表在IDF(Intel Developers Forum)上,Iometer和Dynamo執行程式是授權在Intel Open Source License下,而其核心模組iomtr_kstat則是使用GNU Public License.

由於IOMeter主控制程式並沒有Linux版本,所以要使用IOMeter來測試Linux上的I/O效能時,通常會搭配一個Windows的host端來做測試。Windows User可以直接下載官方上打包好的主程式來安裝,而Linux User則可以下載原始碼包含自行編譯。以i386系統為例,將目錄切換到src底下執行下面指令幾秒鐘內就可編譯完成:

make all -f Makefile-Linux.i386

一個Windows IOMeter Server與Linux dynamo端連線翻例如下:

Windows Host for IOMeter (192.168.0.10):


Linux Client (192.168.0.20):
xinyu:/tmp/iometer-2006_07_27.common-src/src$ sudo ./dynamo -i 192.168.0.10 -m 192.168.0.20
Fail to open kstat device file. You can ignore this warning
unless you are running dynamo on XSCALE CPU.

Command line parameter(s):
Looking for Iometer on "192.168.0.10"

Sending login request...
xinyu
192.168.0.20 (port 57655)
Successful PortTCP::Connect
- port name: 192.168.0.10


連上之後你就會在Windows IOMeter主程式裡看到你的Linux Client端,剩下的操作部份請參考線上文件。

bonnie++

Official Website: bonnie++

Linux底下專門設計來量測硬碟的讀寫效能程式。

sudo apt-get install bonnie++

在預設狀況下bonnie++會自動使用兩倍的記憶體大小的buffer來做測試。

一個範例執行畫面如下:
xinyu$ bonnie++ -d /media/TestDrive/
Writing a byte at a time...done
Writing intelligently...done
Rewriting...done
Reading a byte at a time...done
Reading intelligently...done
start 'em...done...done...done...done...done...
Create files in sequential order...done.
Stat files in sequential order...done.
Delete files in sequential order...done.
Create files in random order...done.
Stat files in random order...done.
Delete files in random order...done.
Version 1.96 ------Sequential Output------ --Sequential Input- --Random-
Concurrency 1 -Per Chr- --Block-- -Rewrite- -Per Chr- --Block-- --Seeks--
Machine Size K/sec %CP K/sec %CP K/sec %CP K/sec %CP K/sec %CP /sec %CP
xinyu 733 98 82251 17 49522 17 2501 99 161162 26 10783 263
Latency 16574us 337ms 506ms 9673us 6121us 4842us
Version 1.96 ------Sequential Create------ --------Random Create--------
xinyu -Create-- --Read--- -Delete-- -Create-- --Read--- -Delete--
files /sec %CP /sec %CP /sec %CP /sec %CP /sec %CP /sec %CP
16 +++++ +++ +++++ +++ +++++ +++ +++++ +++ +++++ +++ +++++ +++
Latency 224us 1764us 510us 217us 8us 36us
1.96,1.96,
xinyu,1,1295148264,6544M,,733,98,82251,17,49522,17,2501,99,161162,26,10783,263,16,,,,,+++++,+++,+++++,+++,+++++,+++,+++++,+++,+++++,+++,+++++,+++,16574us,337ms,506ms,9673us,6121us,4842us,224us,1764us,510us,217us,8us,36us

Orange - data analysis tool

Installation pip install orange3 Run orange python -m Orange.canvas