Building Your Own Homepage Part-III

  • Integrate With Flash
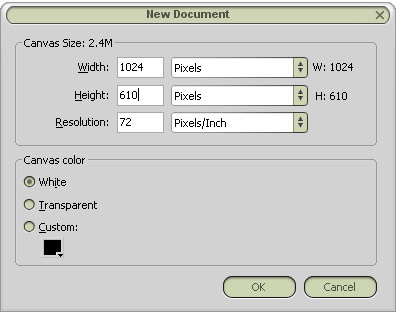
  • Difficulty Level: Beginner

    Requirements:Flash MX or higher

    1. Create New Document
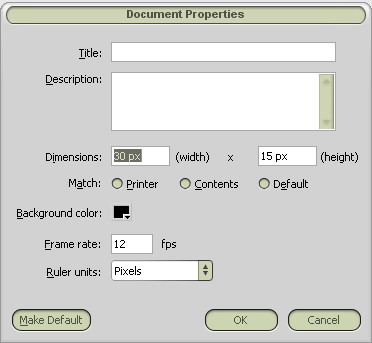
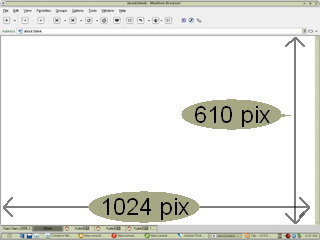
    2. In this example, we want to create a simple music player. Please set the document’s size as small as possible. Don’t make it too large (The size depends on your button’s size.) We choose black as our background color, because our background image is black.

    3. Arrange Layer
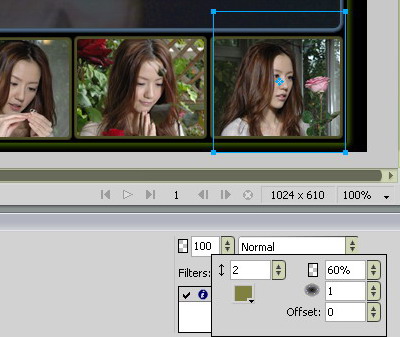
    4. As you can see, there are four layers on our document(Base layer, Mask layer, Button layer, Actions layer)Do not change the order of each layer.

    5. Design Button

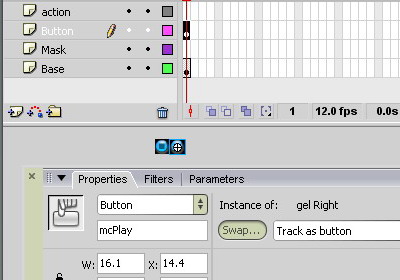
    6. We just use the common library's button. If you don’t like that style of button, you can design it yourself. Don't forget to give each button a name, later, we will use the actionscript to handle the buttons by the instance name.

    7. Add Mask

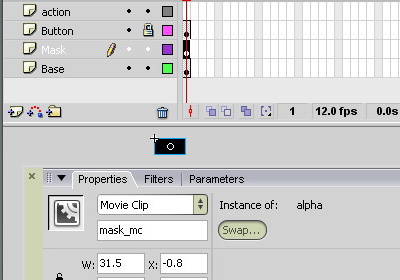
    8. We need a mask to hide our buttons, so the size of mask should be large than those two buttons.

    9. Action Script

    10. Saving the following script as a "player.as" file:

      var music_mc:MovieClip = this.createEmptyMovieClip("music_mc", this.getNextHighestDepth());
      var music:Sound = new Sound(music_mc);
      var Playing:Boolean = false;
      var dir:Number = 0;
      var speed:Number = 10;
      mask_mc._alpha = 100;
      mcPlay._alpha = 0;
      mcStop._alpha = 0;
      function music_play():Void {
      index = "music"+(random(8)+1);
      music.attachSound(index);
      music.setVolume(70);
      music.start(0, 1);
      }
      music.onSoundComplete = music_play;
      mcPlay.onPress = function():Void {
      if (Playing == false) {
      music_play();
      Playing = true;
      }
      };
      mcPlay.onRollOver = function():Void {
      dir = -1;
      };
      mcPlay.onRollOut = function():Void {
      dir = 1;
      mcPlay._alpha = 0;
      mcStop._alpha = 0;
      };
      mcStop.onPress = function():Void {
      music.stop();
      Playing = false;
      };
      mcStop.onRollOver = function():Void {
      dir = -1;
      };
      mcStop.onRollOut = function():Void {
      dir = 1;
      mcPlay._alpha = 0;
      mcStop._alpha = 0;
      };
      mask_mc.onEnterFrame = function():Void {
      var temp:Number = mask_mc._alpha+speed*dir;
      mask_mc._alpha = Math.min(100, Math.max(temp, 0));
      if (mask_mc._alpha == 0) {
      mcPlay._alpha = 100;
      mcStop._alpha = 100;
      }
      };
      stop();


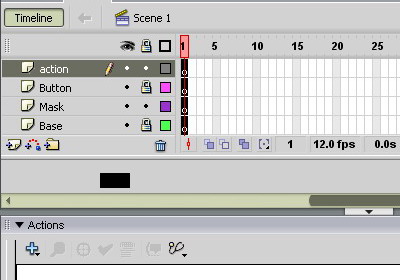
      Add the script "#include "player.as"" on actions layer frame 1.

    11. Preloader(Not necessary)
    12. Do I need a preloader for my music player. If your start page is located on web server and the server is not fast. Particularly, when the size of flash player is too large. Thus, a flash preloader is necessary.
      Creating a flash preloader is quite easy, because I have write down the scripts in "preload.as" file. You just need include this file in your flash preloader, and you will get a very simple flash preloader.

      Here is the demonstration of Flash Music Player


      "Due to the difference of environment setup, your player may not working properly. If you have any questions, comments or would like to show your work, feel free to post on the blog.

Building Your Own Homepage Part-II

  • Integrate with Dreamweaver
    1. Create New Page
    2. In this example, we just need to create HTML page, however, you can create another kind of page, if you are familiar with those language.

    3. Load Image as Background Image
    4. Insert Table
    5. We use table tool to format our page. After inserting table, please remember to set the border value to 0 and the border edge would be hidden.

    6. Insert Favorites Link
    7. Changing the color and font you like, and don’t forget to set the target to “_blank”.

    8. Hide Scroll
    9. In order to hide the scroll, we insert the script (scroll=”no”).

    10. Finish
    11. Congratulation! You have finished to creating your own start page. If you want to integrate with Flash, see the Part-III, I will tell you some simple skill about Flash.

Building Your Own Homepage Part-I

  • Purpose
  • Sometimes, you will feel nothing to do on the internet. Sometimes, you are tired to click the link on your favorites (especially when your favorites store over hundreds of web links). Building your own browser start page is the one of the best way to avoid above situation. Your own "Start Page" would make it fast, and easy to use.


  • Prepare
  • Before doing the great job, you need some basic design skill and patience. In addition, you also need the following software:

    1. Macromedia Fireworks (or any other photo editor: Adobe Photoshop, Ulead PhotoImpact)
    2. Macromedia Dreamwever(or any other web editor: Adobe GoLive, Micorsoft Frontpage )
    3. Macromedia Flash(Optional)

    If you are master those software, building your own start page is a piece of cake.


  • Source material and Subject.
  • You probably need some pictures, music, icon and other materials you like. You can choose movie star, cartoon character for your subject, now we take the singer “Xiao Xiao” for example.


  • Design In Fireworks
    1. Measure the width and height

    2. Take Maxthon(Browser) for example, the width is 1024(the same with the screen resolution), height is 610.

    3. Open new document in Fireworks

    4. Layout Design
    5. Glow Filters
    6. Fireworks support many kinds of filters, such as blur, noise, shadow, sharpen and so on.

    7. Lasso tool
    8. Lasso tool is the most common tool in photo editor. In most cases, we way need to cut the background color (especially, when the background color is not single color). The tool will help you do some complex photo mix.
      Hint: In Photoshop and Photoimpact, they also support the “Magnetic Lasso Tool”. It will auto detect the edge.

    9. Finish
    10. Now, you have finished Part-I Design In Fireworks. In Part-II, I will show you how to integrate with Macromedia Dreamweaver.

Orange - data analysis tool

Installation pip install orange3 Run orange python -m Orange.canvas